If you’re using Skyslope to meet brokerage compliance, you’re already familiar with its role in keeping documents organized and audit-ready.
But managing a transaction, tracking timelines, sending updates, and staying on top of tasks can leave a lot on your plate.
That’s where ListedKit fits in.
In this blog, we’ll walk through a practical, dual-system setup. You’ll see exactly how to manage your process in ListedKit while meeting all compliance requirements by uploading key documents to Skyslope.
Why “Either/Or” Doesn’t Work Anymore
It’s common for brokerages to require Skyslope—and for good reason. It keeps documents organized, compliant, and ready for audit. But if you’re a transaction coordinator, you know that’s only one part of the process.
Your real work happens between those uploads:
- Following up on signatures
- Tracking contract dates and other tasks
- Updating agents and lenders
- Checking documents before they’re final
Skyslope doesn’t help with any of that. And it’s not supposed to.
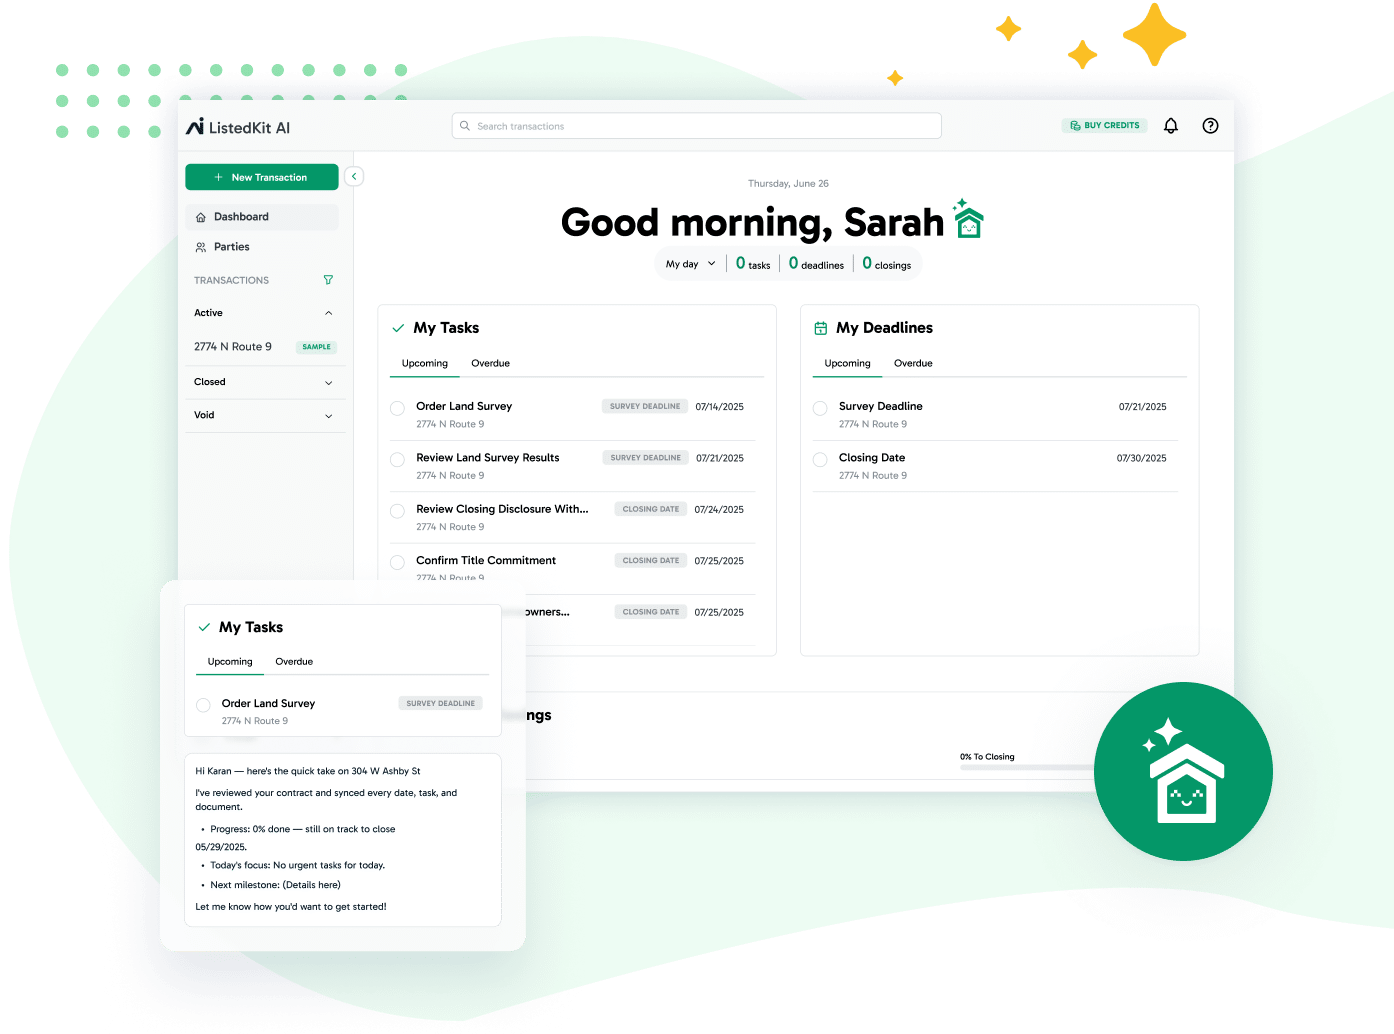
Meanwhile, ListedKit gives you one place to manage communication, assign tasks, use e-signature capabilities, and keep transactions moving forward.
You’re not replacing Skyslope. You’re building a process that actually reflects how real estate deals work.
Here’s a simple example:
- The purchase agreement comes in signed.
- You upload it to the checklist in ListedKit.
- That action triggers three email follow-ups: scheduling inspections, sending initial disclosures, and confirming earnest money.
- Each task has a due date and is tracked on your dashboard.
- Once the final version is ready, you upload it to Skyslope. Then, mark it in ListedKit so you don’t have to double-check later.
Both tools are part of the same system—you’re just giving them clear roles.
Use ListedKit as Your Task and Timeline Command Center
You’re already juggling dozens of moving pieces in each real estate deal. Emails, inspection dates, contract milestones, and last-minute updates from lenders are a lot to track. That’s exactly why using ListedKit as your transaction command center makes such a difference.
Here’s how to structure it to support smoother transactions:
- Start with customizable task lists that reflect your full contract-to-closing process. You can pre-load common deadlines like due diligence, appraisal, and final walkthrough—and add brokerage-specific compliance items, too.
- Assign responsibilities across the team. For example, you might tag a real estate agent for buyer-side documents or a title company for title work. Keeping this clear helps avoid communication pitfalls and last-minute confusion.
- Use deadline tracking and automatic reminders to prevent things from slipping through. Tasks can be triggered by dates or events, giving you and your collaborators timely nudges.
- Track real-time updates across the transaction without relying solely on your inbox. When something changes—like an updated offer or a delayed inspection—it lives in one place, not scattered across multiple threads.
- Stay in sync with communication tools. ListedKit lets you keep a log of client communication, agent updates, and internal notes so that nothing has to be remembered manually.
Besides the key features above, ListedKit also easily integrates with platforms like Google Calendar, so you can easily align your deadlines with important meetings.
For coordinators working across several transaction types, this level of control over communication and timing is essential to delivering a positive client experience while more efficiently managing administrative and compliance-related tasks.
When to Upload to Skyslope (and What to Include)
Think of Skyslope as the final destination for key transaction documents, not the place where your process begins.
The key to using it effectively is knowing what to upload and when to do it.
Here’s a working upload schedule based on common transaction milestones:
- Signed listing agreement. Once fully executed, upload it immediately. Don’t upload partial documents or unsigned versions—these create clutter and confusion during audits.
- Executed purchase contract. As soon as both parties have signed and you’ve verified the accuracy, move it to Skyslope. This is often the first document your broker checks during review.
- Disclosures and addenda. Upload only the final, complete versions, especially if multiple rounds occurred during negotiation. Keeping track of these through a detailed process document in ListedKit helps prevent errors.
- Final closing docs. Closing statements, settlement statements, and commission instructions should all be saved in Skyslope after the transaction wraps.
Use file naming conventions that align across both systems, such as 456Oak_Contract_Signed.pdf. This reduces time spent digging later and improves the accuracy of your digital document management process.
How to Avoid Double Work
One of the biggest challenges for transaction coordinators is the repetition that comes from managing tasks in multiple systems.
When tracking deadlines in your checklist, updating statuses in a broker portal, and responding to agent questions via email, things get messy—and time-consuming.
To reduce this duplication, structure your process like this:
- Tag compliance-related tasks in your ListedKit workflow. That way, you only need to check one place to see what still needs to be uploaded to Skyslope.
- Use detailed notes for Skyslope entries. For example, in the comments of a task, you might add a description like “Uploaded executed disclosures to Skyslope on 4/2.” That entry helps reduce miscommunication and improves your audit trail.
- Set up visual indicators like statuses or columns—for example, “Ready for Skyslope” or “Uploaded.” This will save you from needing to cross-check between emails and systems.
- Standardize file naming conventions so that you can recognize documents quickly, even if someone else uploaded them. This matters when working with title companies, agents, or third parties.
- Combine administrative tasks into one checklist view. Avoid building two separate task systems—ListedKit can carry the full load for real-time task tracking, compliance reminders, and agent-facing updates.
This method is especially effective for growing a transaction coordinator business. When you work with multiple agents or offer a transaction coordination service to several clients, minimizing repetitive tasks can help you take on more volume without raising overhead costs or reducing service quality.
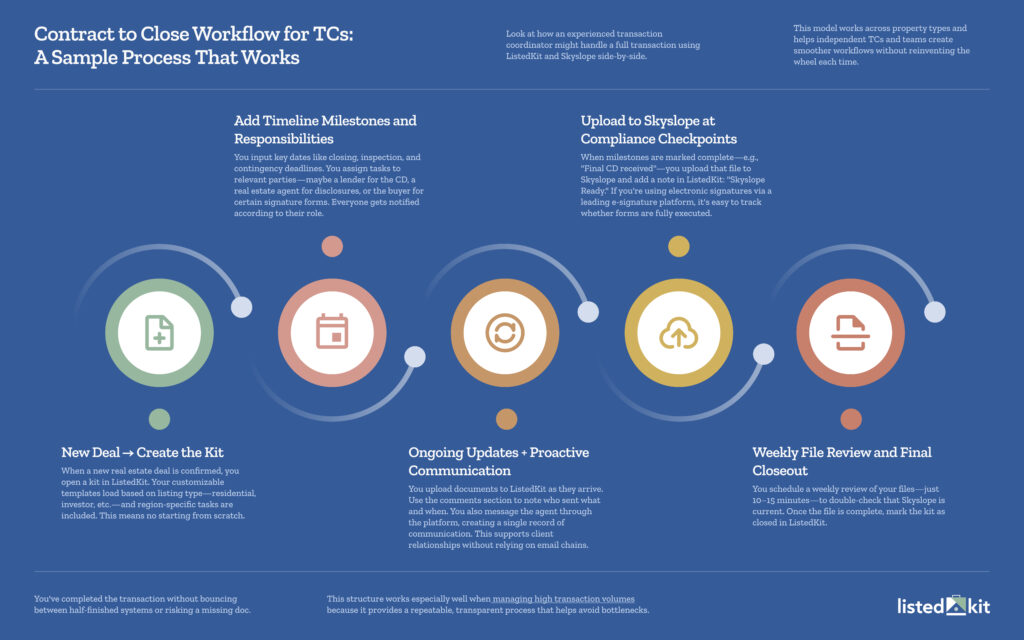
Real-World Workflow: A Sample Process That Works

Look at how an experienced transaction coordinator might handle a full transaction using ListedKit and Skyslope side-by-side.
This model works across property types and helps independent TCs and teams create smoother workflows without reinventing the wheel each time.
Step 1: New Deal → Create the Kit
When a new real estate deal is confirmed, you open a kit in ListedKit. Your customizable templates load based on listing type—residential, investor, etc.—and region-specific tasks are included. This means no starting from scratch.
Step 2: Add Timeline Milestones and Responsibilities
You input key dates like closing, inspection, and contingency deadlines. You assign tasks to relevant parties—maybe a lender for the CD, a real estate agent for disclosures, or the buyer for certain signature forms. Everyone gets notified according to their role.
Step 3: Ongoing Updates + Proactive Communication
You upload documents to ListedKit as they arrive. Use the comments section to note who sent what and when. You also message the agent through the platform, creating a single record of communication. This supports client relationships without relying on email chains.
Step 4: Upload to Skyslope at Compliance Checkpoints
When milestones are marked complete—e.g., “Final CD received”—you upload that file to Skyslope and mark it with a status in ListedKit: “Skyslope Ready.” If you’re using electronic signatures via a leading e-signature platform, it’s easy to track whether forms are fully executed.
Step 5: Weekly File Review and Final Closeout
You schedule a weekly review of your files—just 10–15 minutes—to double-check that Skyslope is current. Once the file is complete, mark the kit as closed in ListedKit.
You’ve completed the transaction without bouncing between half-finished systems or risking a missing doc.
This structure works especially well when managing high transaction volumes because it provides a repeatable, transparent process that helps avoid bottlenecks.
What This Means for Your Compliance Workflow
Using ListedKit and Skyslope in tandem helps shape a compliance workflow that respects your time and supports your responsibilities.
Here’s what this structure gives you:
- Task management that’s actually useful. Instead of writing notes to yourself or bouncing between spreadsheets, everything lives inside a platform designed for real estate transaction coordinators.
- Smooth communication between parties. You can track conversations, reduce miscommunication with agents and clients, and build strong relationships across deals.
- Clear digital signatures and document storage. Whether you’re working with bulk sending or a few clients at a time, the document record stays easy to follow.
- Less second-guessing. You’re not wondering if a file was uploaded, who last sent an update, or which version is final.
- There is more room to scale. Whether you’re an entry-level coordinator looking to grow or run a full transaction coordination service, this process can be flexible for you.
Real estate transactions are too important to leave to scattered notes and manual updates. You’re building a smarter, stronger system from day one with the right tools.
Build a Workflow That Supports You
A smarter compliance workflow means clearly defining each tool’s purpose and using it where it shines. ListedKit helps you move deals forward with visibility and ease, while Skyslope helps your broker stay in compliance.
When you set them up to work together, you create a system that works for everyone—agents, brokers, and most importantly, you.
It’s a structure you can rely on, no matter how fast things move or how many deals are in progress.
See how ListedKit fits into your compliance workflow—book a free walkthrough and start building a setup that gives you more control with less effort.


