Virtual Assistant (VAs) Onboarding Guide For Real Estate
Transaction files piling up faster than you can sort them? Feeling like there just aren’t enough hours in the day to keep everything moving smoothly? You’re not alone. As your business thrives, keeping up with your workload can feel impossible. That’s where Virtual Assistants (VAs) typically come in. But how do you effectively onboard a real estate virtual assistant without a system in place?
In this blog, we’ll unlock the secrets to seamlessly integrating new team members without skipping a beat. We’ll explore strategies to streamline your workflow, empower new hires, and finally reclaim your sanity (and your weekends!). Let’s dive in!
Defining Roles and Responsibilities in Real Estate Transactions
In the world of real estate transactions, clarity is key. Defining roles and responsibilities within your team can make all the difference in ensuring smooth operations and seamless deals.
When it comes to structuring your team’s roles, there are different approaches you can take. Some teams prefer to have lead TCs overseeing and managing transactions from agents end-to-end. This approach fosters consistency and a personal touch, streamlining communication and decision-making.
Alternatively, some teams leverage specialized Virtual Assistants (VAs). This method breaks down the transaction process into specific tasks. VAs handle scheduling appointments, drafting amendments, and managing paperwork. This allows team members to specialize in their areas of expertise, which maximizes efficiency and productivity. This model is ideal for scaling your team and handling a high volume of transactions.
No matter which structure you choose, delegation is crucial. Experts recommend delegating everything except sales, marketing, and core operational tasks. By empowering your team to handle specific tasks, you free yourself up to focus on the big picture: growing your business and closing deals.
Using ListedKit to Streamline Your Business Onboarding Process
As a Transaction Coordinator (TC), the thought of expanding your team with new Virtual Assistants (VAs) or team members can be both exciting and daunting. With years of experience, you’ve likely perfected your systems, but keeping everything in your head can become overwhelming as your transaction volume grows. This is where setting up structured systems for onboarding becomes crucial.
Enter ListedKit – a game-changer in helping you map out your existing systems into templates and checklists that can be easily shared and replicated. While it may take some intention upfront, especially if you’re used to storing information in your mind rather than spreadsheets, the long-term benefits are well worth it.
By leveraging management software like ListedKit, you can create a standardized onboarding process that ensures new VAs or team members have clear guidance from day one. No more relying on memory or hastily scribbled notes – everything they need to know is neatly organized and accessible.
ListedKit allows you to streamline tasks, set up reminders, and establish accountability within your team. The platform’s customizable templates and checklists provide a solid foundation for consistent and efficient workflows, reducing the chances of errors or oversights.
Transitioning from a mental database to a digital platform like ListedKit may seem daunting at first, but the payoff is significant. Not only does it free up valuable mental space, but it also sets your team up for success by providing clear guidelines and expectations for new hires.
Feeling overwhelmed?
Get Organized with our FREE Pre-Contract & Under-Contract Checklist (Customize it as needed!).
Trust forms the foundation of successful business relationships. It is crucial to invest time in cultivating trust and rapport with your team members. By demonstrating honesty, reliability, and integrity, you can create a strong bond with your team members.
Encouraging open communication and collaboration is key to fostering trust and ensuring alignment with your vision and objectives. By valuing the input and ideas of your team members, you can create a collaborative environment where everyone feels heard and appreciated.
Recognizing the dedication and passion of your team members is essential for building trust and collaboration. By fostering a supportive environment where everyone feels valued and motivated, you can create a positive work culture that promotes teamwork and mutual respect.
Continuous Improvement and Adaptation
Onboarding new Transaction Coordinators (TCs) or Virtual Assistants (VAs) is not a one-time deal. It’s a continuous journey of refining and adapting processes to achieve optimum efficiency. At the core of this process lies the invaluable feedback from TCs and agents, pinpointing areas for enhancement and driving necessary changes.
We believe in the power of feedback. Soliciting input from TCs and agents is crucial in identifying pain points, understanding challenges, and uncovering opportunities for improvement. By fostering an environment of open communication and collaboration, you can pave the way for continuous growth and development in your onboarding procedures.
Stagnation is not an option. It’s important to remain open to exploring new strategies and technologies that can revolutionize the way you handle transaction coordination. Embracing innovation allows you to stay ahead of the curve, enhancing efficiency, and boosting productivity in your operations.
Closing Thoughts
Onboarding new TCs or VAs isn’t just about adding staff power. It’s about laying the foundation for sustainable growth and success in your real estate business. With the right systems in place, you can streamline your operations and expand your transaction capacity significantly.
Implementing tools that create automated systems like ListedKit helps you streamline the onboarding process, providing clear guidance and accountability from day one. This transition not only frees up mental space but also sets your team up for success with consistent workflows and reduced errors.
Start a 30-day free trial today and use ListedKit to build operating procedures that can help your team grow effectively.
Feeling overwhelmed by endless tasks and tight deadlines? If juggling multiple transactions and keeping track of every task in your head is leaving you stressed and overwhelmed, it’s time for a change. In this blog, we’ll unveil the secrets to organizing your workload with a powerful real estate task management system. Let’s dive in!
The Power of Task Management for Transaction Coordinators
Relying solely on manual methods like spreadsheets and mental notes can create a constant sense of overwhelm and increase the risk of errors.
Task automation offers a solution, empowering real estate transaction coordinators to streamline their workflow and reclaim control. Imagine opening files in seconds with pre-built templates, effortlessly prioritizing tasks across all your transactions, and waving goodbye to the chaos of spreadsheets and mental juggling.
Here’s how:
Automatic due dates based on closing dates or contract signings help you stay organized and ensure you never miss a crucial step.
By creating task templates for different transaction stages, you can guarantee a consistent and thorough process for all your transactions.
Having a real estate task management system helps you prioritize tasks across all projects, keeping the most urgent items at the forefront and ensuring you’re always focused on the right thing.
Automating repetitive tasks frees up your mental energy for more strategic tasks, fostering a calmer and more focused work environment.
Automated tasks and clear deadlines minimize the risk of human error, ensuring all vital steps are completed accurately and on time.
With a clear and automated workflow, you gain a greater sense of control over your workload, fostering confidence and reducing feelings of overwhelm.
This blog will delve deeper into the practical aspects of implementing a task management system, guiding you through the setup process, exploring different tools and functionalities, and ultimately empowering you to navigate your day with greater ease and efficiency.
Implementing Your Task Management System
Now that you understand the transformative potential of task automation, let’s dive into the practical steps of setting it up for your workflow.
1. Setting Up Your System
Migrating to a new system can feel daunting, especially with ongoing transactions. Thankfully, many transaction management platforms like ListedKit offer migration services, easing the transition by transferring your checklists and email templates.
However, instead of attempting a complete data migration immediately, we recommend taking a “start small” approach. Begin by creating new files directly in your chosen system instead of your usual spreadsheet. This allows you to familiarize yourself with the interface and experience the efficiency benefits firsthand.
ListedKit, for instance, uses an AI reader to extract key transaction details from contracts, saving you valuable time and minimizing errors. Simply review the extracted information and fill in any missing details, including crucial dates like closing and contract signings, as these will be used to automatically set task due dates.
Finally, select the pre-built task checklist most relevant to your transaction, and voila! You’ll have a clear overview of upcoming tasks with their respective deadlines, along with ready-made email templates to streamline communication.
Compared to a static spreadsheet, an automated system like this already offers significant value by saving you time, minimizing errors, and providing a centralized location for all transaction-related information.
Once you feel comfortable managing new tasks within your chosen system, you can take the next step and import your existing data (if applicable).
Remember, the goal is to empower you, not overwhelm you. Start small, experience the benefits firsthand, and gradually migrate your existing data with the support of your chosen platform’s migration services.
In the next section, we’ll explore how to further customize and build robust workflows within your chosen system, ensuring a seamless transition and an empowered experience.
2. Building Your Custom Task Templates
With the foundational setup complete, it’s time to unleash the full potential of your chosen system by building customized workflows. This empowers you to:
Define Key Tasks and Stages:
Start by identifying the key tasks and stages involved in each transaction type. This could involve pre-approval, underwriting, inspections, closing, and post-closing stages, with each stage containing specific tasks and deadlines.
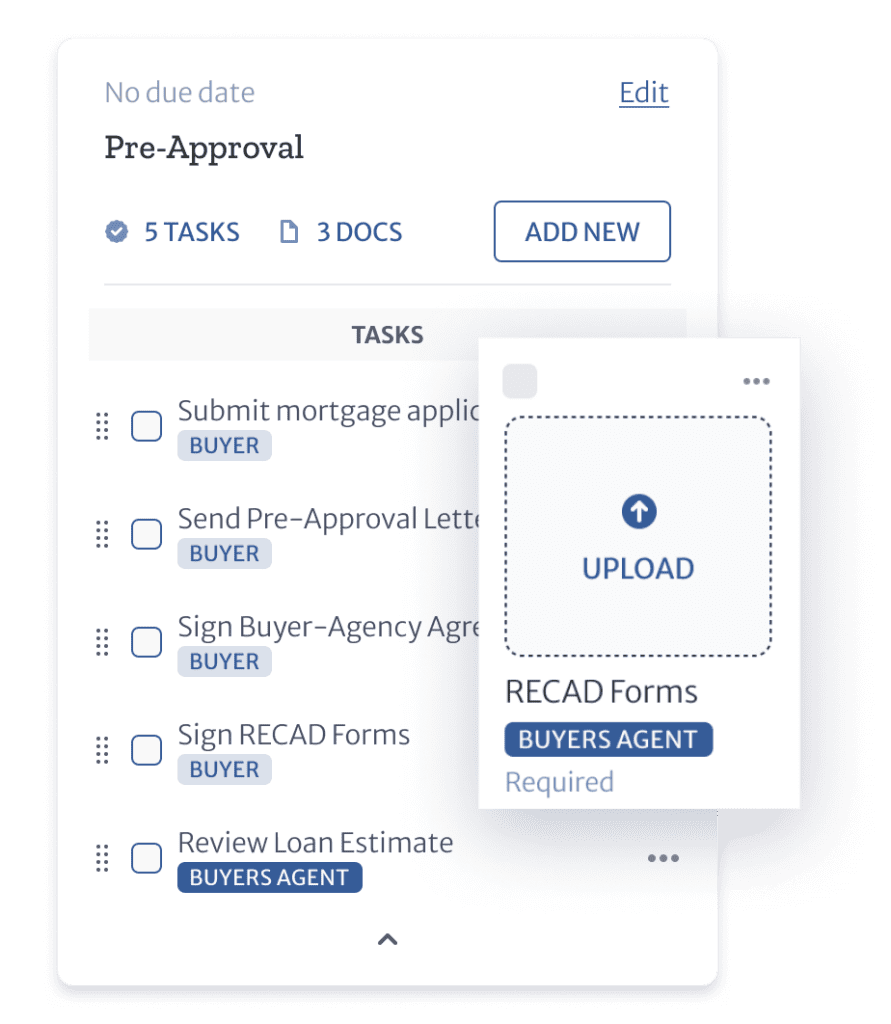
Create ListedKits (Templates):
Leverage the power of ListedKITS, which act as templates to automate repetitive tasks within each transaction stage. For instance, you can create a ListedKit for “pre-approval” that automatically includes tasks like collecting client documents, submitting loan applications, and following up with lenders. This eliminates the need to manually add these tasks for each new file, saving you significant time and effort.
Customize for Specificity:
Remember, there’s no one-size-fits-all approach. Tailor your workflows to fit your specific needs and preferences. Adjust deadlines, add or remove tasks, and personalize ListedKits to perfectly align with your unique process.
By following these steps, you’ll transform your chosen platform from a basic task management tool into a powerful workflow engine that streamlines your work, reduces errors, and empowers you to navigate your workload with greater confidence and control.
Once you feel comfortable with your custom workflows, you can take the next step and import your existing data (if applicable). This process doesn’t have to be overwhelming. We encourage you to take advantage of our free migration assistance to help you make the transition smoother.
In the next section, we’ll discuss the crucial step of getting your agents on board with your new system, ensuring a smooth transition and maximizing the benefits for your entire team.
3. Getting Your Team Onboard: Ensuring a Smooth Transition
If you’re an in-house transaction coordinator working with a team of agents, getting them on board with your new system is crucial for maximizing its effectiveness. Here are two key strategies:
Open Communication
Open communication is crucial. Make sure to communicate clearly the benefits of the new system, emphasizing how it will streamline workflows, improve collaboration, and ultimately elevate the client experience for both the agents and their clients. Encourage questions and address any concerns they may have.
Addressing Concerns and Ensuring a Smooth Transition
Acknowledge that some agents might be comfortable with your current processes. Reassure them that the new system is designed to complement their work, not replace them.
Emphasize that they can continue to reach out to you directly with any questions or concerns. However, encourage them to explore the system’s capabilities and utilize the portals. These provide an easy way for them to gain greater visibility into their transactions.
Leverage the Agent Portal (if applicable)
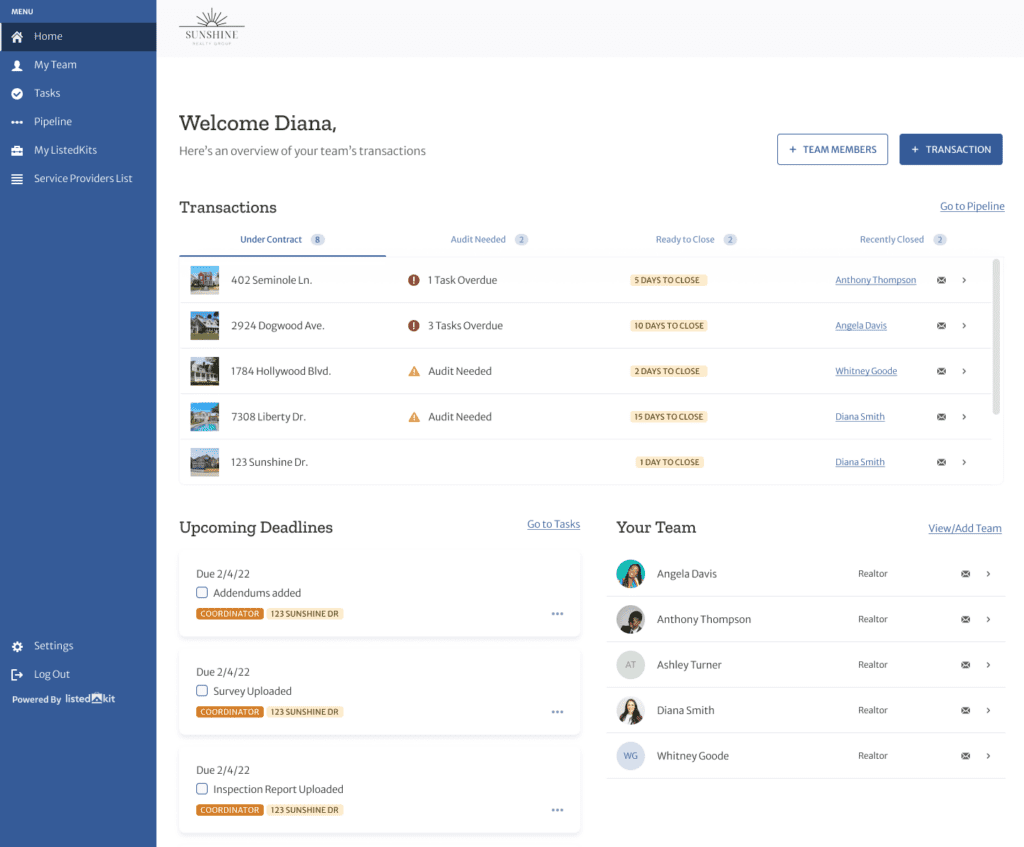
Many real estate task management systems like ListedKit offer a dedicated agent portal. The agent portal provides agents with a filtered view of only their assigned transactions. It also showcases historical tasks completed and upcoming tasks requiring their attention. In addition to a dashboard displaying a comprehensive overview of their transaction portfolio and their respective statuses.
By incorporating these strategies, you can ensure a smooth transition for your agents, fostering a collaborative environment and maximizing the benefits of your new workflow automation system for your entire team.
Closing Thoughts
Ready to ditch the spreadsheets and embrace a smarter, more efficient way to manage your workload? This blog has equipped you with the knowledge and steps to implement a powerful workflow system. Remember, the key is to start small, experience the benefits firsthand, and gradually migrate your existing data.
ListedKit offers a free 30-day trial, giving you the perfect opportunity to experience the transformative power of task automation firsthand.
Imagine:
Effortlessly managing multiple transactions with pre-built templates and automated deadlines.
Prioritizing tasks with confidence and reducing the stress of missed deadlines.
Freeing up valuable time to focus on strategic tasks and client relationships.
Don’t wait any longer.
Start your free trial today and see how ListedKit can help you reclaim control and conquer your workload!
Feeling overwhelmed by a messy inbox and endless emails? As a transaction coordinator, staying organized is key to success. This guide explores five handy tips to organize the chaos and transform your Gmail inbox into a powerful productivity tool.
Tip 1: Use Color-Coded Labels
Labels in Gmail offer transaction coordinators a powerful way to organize their emails efficiently. By color-coding labels, you can easily categorize and prioritize important emails related to different transactions. This not only streamlines your workflow but also enhances productivity by providing quick access to specific information.
To use labels effectively, you can create labeled folders for each transaction or client, such as “Pending Contracts” or “Completed Inspections.” You can then assign colors to these labels for visual distinction and easier identification.
However, managing clutter on mobile devices can become a challenge when dealing with numerous labeled emails. This is where ListedKit comes in as a superior solution for transaction management. ListedKit offers a one-stop transaction dashboard that organizes emails seamlessly, allowing coordinators to track documents, attachments, and communication within a centralized platform.
With ListedKit’s intuitive interface and comprehensive features, transaction coordinators can say goodbye to email clutter and enjoy efficient workflow management.
Tip 2: Leverage Email Automation Tools
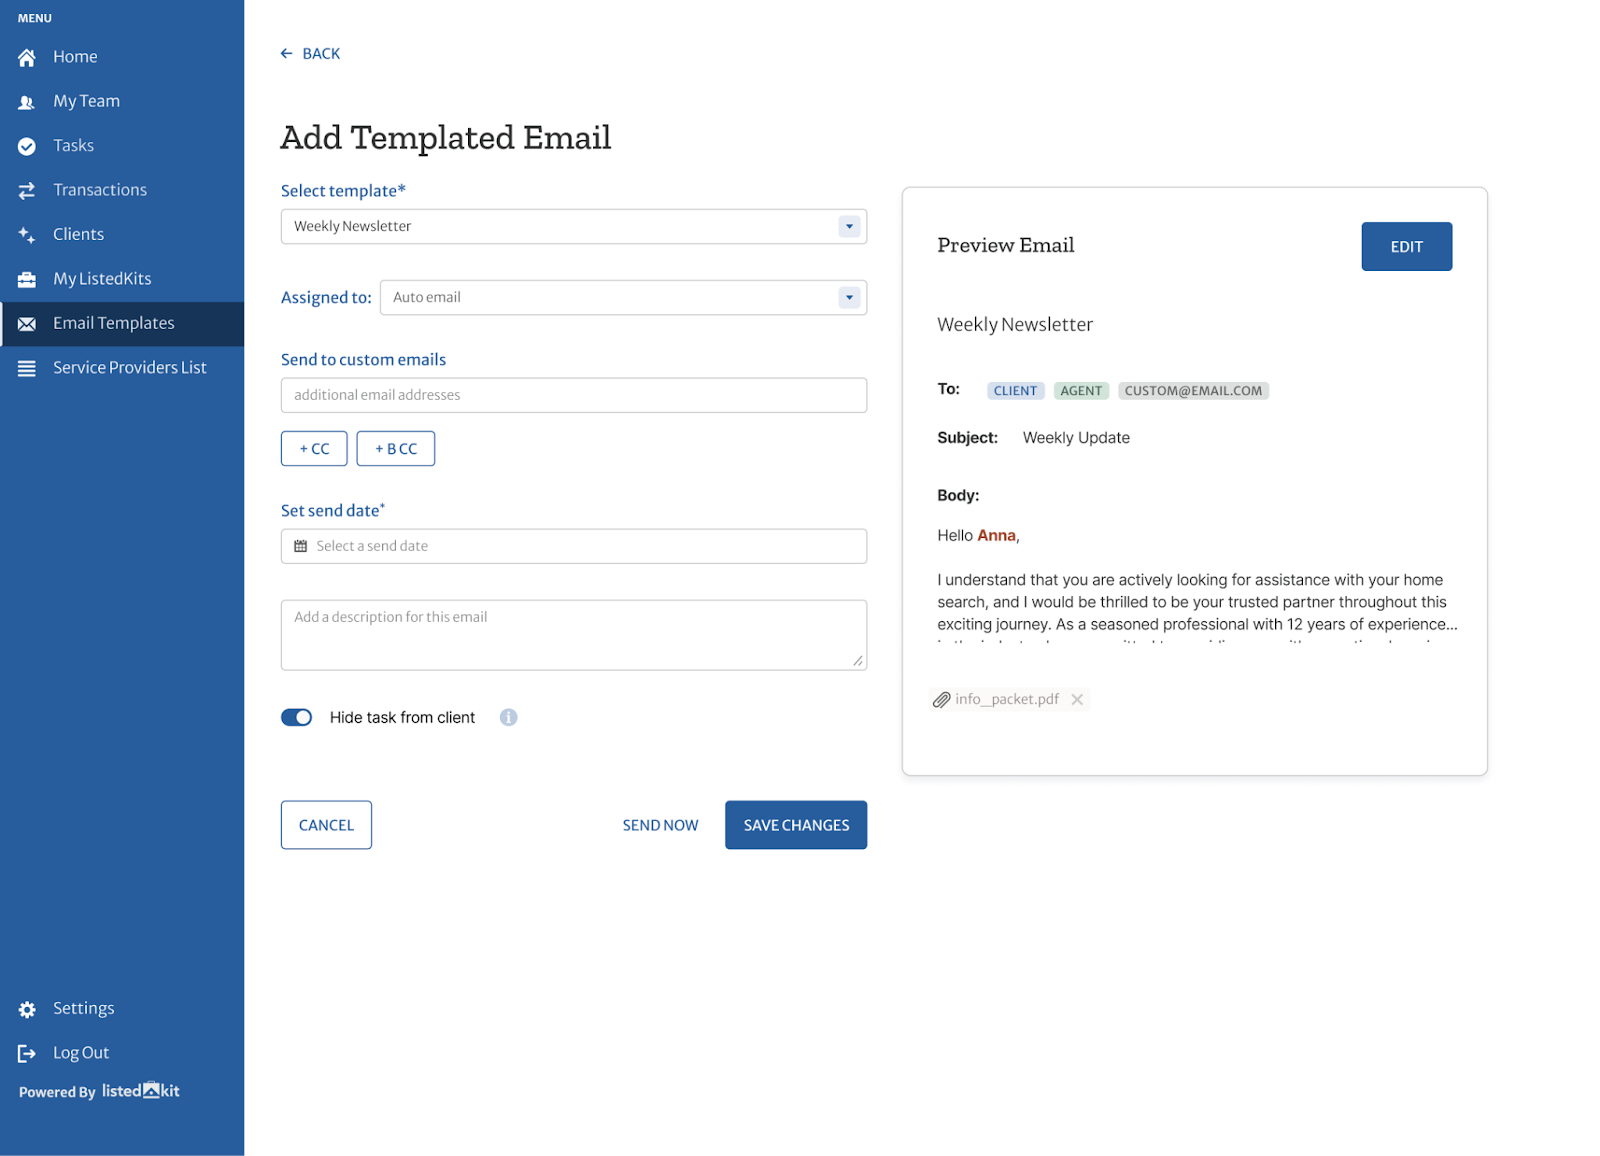
For transaction coordinators looking to streamline their email management, a valuable tip is to utilize email automation tools to simplify the process. By setting up email templates and scheduling automated emails for key transaction milestones, you can save time and ensure timely communication with all parties involved. This approach can help maintain organization, improve efficiency, and enhance overall transaction coordination.
Tools like ListedKit offer transaction coordinators a seamless solution to streamline email sending and keep transactions organized. By leveraging ListedKit’s email automation features, coordinators can send emails directly from the platform using their domain/email address, ensuring a professional touch in communication. This also allows you to maintain a detailed history per transaction, making it easier to track progress and stay organized throughout the deal lifecycle.
Tip 3: Export Email Threads as PDFs
As a transaction coordinator, your inbox is probably filled with important emails related to completed deals. Using PDFs is a professional and efficient method to share comprehensive transaction information with clients. To export email threads, follow these steps:
Open the relevant email thread: Navigate to the email chain for the closed transaction you want to export.
Access the print menu: Click the three vertical dots (•••) in the top right corner and select Print.
Choose “Save as PDF”: Under Destination, select Save as PDF.
Customize your PDF: In the Print settings, you can adjust formatting, page range, and margins to capture the desired information.
Save and organize: Choose a descriptive filename and save the PDF in a dedicated folder for closed transactions. You can create subfolders by client or property for further organization.
Tip 4: Hide Labels and Subfolders for a Clean Inbox
Feeling swamped by a multitude of labels and subfolders? Keeping an organized Gmail inbox is key for a transaction coordinator. Discover how to use Gmail’s hiding features to tidy up your view, minimize interruptions, and uphold a clutter-free inbox.
Archive closed subfolders: Move them out of your main view while keeping them accessible if needed.
Utilize filters: Create filters to automatically archive emails upon closing a deal.
Leverage Listedkit: Explore real estate specific tools like Listedkit, which offer advanced filtering based on transaction status (under contract, review needed, closing date passed, etc.).
Remember, “hidden” doesn’t mean gone! Archived emails and subfolders are still searchable and accessible whenever you need them.
Tip 5: Use Gmail Filters to Automate Everyday Actions
Gmail filters offer powerful tools to automate common tasks and maintain a stress-free workspace. Let’s delve into how filters can streamline your workflow:
Skip the inbox: Archive unimportant emails (e.g., marketing newsletters) to avoid cluttering your main view.
Mark as read: Automatically mark emails from specific senders (e.g., recurring reports) as read upon arrival, saving you time.
Star important emails: Instantly highlight critical messages (e.g., client inquiries) with a star for easy follow-up.
Organize with labels: Automatically assign labels (e.g., “Offer Accepted,” “Closing Docs”) based on keywords or sender names for effortless organization.
Forward important updates: Streamline communication by auto-forwarding specific emails (e.g., lender updates) to relevant colleagues.
Delete spam automatically: Eliminate manual “trash duty” by setting filters to automatically delete spammy emails.
Whitelist important senders: Ensure emails from important contacts (e.g., title companies) never get lost by adding them to a whitelist.
Prioritize key messages: Auto-mark key messages (e.g., contract deadlines) as important for easier identification.
Categorize emails efficiently: Utilize Gmail’s categories (e.g., Social, Promotions) by filtering emails into the appropriate sections for better organization.
Remember to begin with basic filters and gradually refine them as needed and make sure to test that the filters work as intended before applying them to your entire inbox. By harnessing the power of Gmail filters, you can transform your inbox from a chaotic mess into a well-organized and efficient command center, empowering you to focus on what matters most – successfully managing your transactions.
Closing Thoughts
Managing countless emails as a transaction coordinator can be overwhelming. But remember, you’re not alone! This guide offered five practical tips to help you transform your Gmail into an organized and efficient tool, empowering you to manage transactions with ease.
Remember; the key is to embrace the power of organization and technology to streamline your workflow and enhance your productivity. So, consider taking your productivity even further with real estate management systems like ListedKit. This platform offers a centralized hub for managing documents, communication, tasks, and more.
The transaction coordinator landscape is booming, and with it, competition! Feeling the pressure to stand out and crush your revenue goals? You’re not alone. While traditional Transaction Coordinators focus on the contract-to-close phase, there’s an increasing demand for assistance outside of the contract-to-close period. We’re talking marketing support, pre-listing prep, compliance tasks, etc. By venturing in and offering tangential services to agents you can become an invaluable partner and expand the revenue those clients are bringing in for your Transaction Coordination business. This blog unlocks 5 powerful marketing services you can add to your arsenal, propelling you towards success. Let’s dive in!
1. Content & Design: Become Their Marketing Powerhouse!
Forget spreadsheets and emails; dive into the creative realm! Offering design and content creation complements your existing skills and makes you an agent’s one-stop marketing shop.
Direct Mail Mastery: Craft targeted postcard or brochure campaigns highlighting your expanded services. Charge a per-piece design and printing fee.
Monthly Newsletter Magic: Create engaging content and visually stunning layouts for monthly or annual subscriptions. Agents will love market updates, client success stories, and valuable tips.
Blogosphere Brilliance: Establish your expertise with a blog creation & management package. Partner with local publications or directly with agents for promotion.
Proofreading Prowess: Ensure accuracy and professionalism with your keen eye. Offer per-word or per-piece proofreading services for marketing materials.
Social Media Savvy: Help agents leverage the power of social media with management packages. Create content, manage interactions, and run targeted ad campaigns.
Video Visionary: Embrace the visual age! Offer video editing, creation, and YouTube channel management for virtual tours, walkthroughs, and local insights.
Pro Tip: Start with one or two services you enjoy, gradually expanding as you gain experience and feedback.
2. Client Resources: Be Their Information Hub!
Go beyond closing and transform into a valuable information hub for clients! Your efforts save agents time and showcase your commitment to a smooth transaction. Remember, personalization is key! Cater resources to specific needs and offer tiered options for varying budgets.
Branded Buyer/Seller Packets: Design personalized checklists like these to help clients understand the closing process and set expectations. Offer branding with their visual identity for a personalized touch.
Listing Information Binders: Help agents stay organized with custom-designed binders containing property specs, photos, and marketing materials. Charge a design and printing fee per binder.
Eye-Catching Property Flyers: Utilize tools like Canva to design flyers showcasing key features and promoting open houses. Offer design and printing services tailored to specific listings.
Pro Tip: Consider including downloadable resources on your website for added value.
3. Homeowner Engagement: Keep Them Buzzing!
Become a master of engagement, keeping homeowners informed, excited, and actively involved throughout the process.
Captivating Advertising & Marketing Letters: Reach out to potential sellers with informative and engaging letters highlighting your services and market updates. Charge a per-letter design and printing fee.
Open House Extravaganza: Take open houses to the next level with creative flyers, eye-catching signage, and strategic social media promotion packages.
Your Personal Online Hub: Establish an online presence showcasing your expertise with website design, development, and maintenance services.
Showcase Testimonials: Post glowing reviews on your website and social media. Offer testimonial promotion packages to agents.
Pro Tip: Encourage client interaction on social media and respond promptly to queries.
4. Brand Management: Become a Complete Package!
Don’t settle for being just a TC; become the ultimate brand architect for your clients! By offering comprehensive brand management services, you can elevate their presence, attract high-value clients, and solidify your role as a true business partner.
Cohesive Brand Identity: Develop a strong and memorable brand across all platforms with brand identity development and implementation packages.
Personalized Closing Gifts: Go beyond generic mugs! Select thoughtful and personalized gifts for clients. Offer closing gift selection and delivery services.
Informational Resources: Equip agents and clients with knowledge! Design and create comprehensive guides and resources on essential real estate topics. Offer content creation and design services for custom resources.
Pro Tip: Offer retainer options for ongoing brand management, ensuring consistent messaging and adaptation to market changes.
5. Testimonials & Publicity: Let Your Work Shine!
Don’t let your amazing work stay hidden! Unleash the power of testimonials and publicity to showcase your expertise, attract new clients, and solidify your reputation in the market.
Share the Love: Post Testimonials: Display glowing reviews on your website, social media platforms, and marketing materials. Offer testimonial promotion packages to agents, amplifying their positive experiences and reaching a wider audience.
Think Outside the Box: Public Advertisements: Explore unconventional advertising mediums that go beyond traditional channels. Develop targeted campaigns for agents, leveraging unique avenues like local publications, community events, or partnerships with other businesses.
Enhance Listings: Simple Floor Plan Layouts: Offer clear and professional floor plan designs on a per-listing basis. Enhance property listings with visuals that help potential buyers easily envision the space and its potential.
Remember, authenticity is key! Encourage genuine testimonials from satisfied clients, and choose public advertising mediums that align with your target audience and brand image. By strategically showcasing your accomplishments and positive client experiences, you’ll get more referrals, build trust, and establish yourself as a top contender in the TC game!
Closing Thoughts
The landscape of transaction coordination is transforming, and the time to stand out is now. By diversifying your skillset and venturing beyond the confines of traditional TC services, you unlock the potential to become an invaluable partner for agents and dominate your market. This blog has explored 5 powerful marketing ideas you can integrate into your offerings:
1. Content & Design: Become their one-stop marketing shop, crafting targeted mailers, engaging newsletters, and professional marketing materials.
2. Client Resources: Transform into a valuable information hub, providing branded buyer/seller packets, personalized listing binders, and eye-catching flyers.
3. Homeowner Engagement: Foster excitement and involvement with captivating ad letters, open house extravaganzas, and an informative online presence.
4. Brand Management: Elevate your clients’ image with cohesive brand identity, personalized closing gifts, and informative resources.
5. Testimonials & Publicity: Let your success speak for itself through glowing testimonials, unconventional public advertisements, and professional floor plan layouts.
Remember, you don’t have to conquer them all at once! Start small, refine your skills, and gradually expand your services based on your interests and client feedback. Building a thriving business takes time, so celebrate every milestone, learn from each experience, and keep refining your approach.
Was this content helpful? Join our email list for exclusive resources and tips on how TCs can leverage marketing services to attract more agents, expand their income, and streamline their workflow.
Was this content helpful?
Join our email list for exclusive resources and tips on how TCs can leverage marketing services to attract more agents, expand their income, and streamline their workflow.
As a transaction coordinator (TC), you hold a pivotal position in ensuring the seamless closing of a real estate transaction. As the closing date approaches, your responsibilities intensify to guarantee that every necessary document is meticulously gathered, prepared, and submitted to the relevant parties. TCs act as the conduit between buyers, sellers, agents, and other stakeholders. Therefore, your role is to ensure that all parties involved are aligned and facilitate a successful real estate closing. As an additional service, it’s not uncommon for TCs to also provide closing checklists to buyers and sellers, further streamlining the process. With this in mind, let’s delve into the essential tasks you’ll need to tackle in the 10 critical days leading up to closing.
1. Schedule the Closing
Initiating communication with the title company, buyer, and seller is the first step. Since the pandemic, flexibility in location and format has become more common, with options like e-closings and curbside closings emerging. Key individuals expected to be present include buyers, buyer’s agents, sellers, listing agents, and escrow officers.
2. Arrange Final Walkthrough
The final walkthrough serves as a crucial last step in the real estate transaction process, providing buyers with the opportunity to verify that the property is in the agreed-upon condition before closing. Timing is essential for this inspection, ideally taking place as close to the closing date as possible to minimize the likelihood of any new issues arising.
Collaborating with the real estate agent and clients, the transaction coordinator (TC) coordinates the scheduling of this inspection. It’s imperative to confirm the time and location of the walkthrough, ensuring that both buyers and sellers are available to attend if necessary.
During the final walkthrough, buyers should pay close attention to several key factors to ensure the property meets their expectations. This may include:
Checking that all agreed-upon repairs have been completed satisfactorily.
Verifying that all fixtures, appliances, and systems are in working order.
Ensuring that the property is in the same condition as when they made their offer, aside from normal wear and tear.
Inspecting for any signs of damage or unexpected changes since their last visit.
To assist buyers in conducting a thorough final walkthrough, TCs can provide them with a comprehensive checklist outlining essential items to inspect.
3. Collect Repair Documentation
If repairs were negotiated, the transaction coordinator (TC) must gather proof of completion. This includes itemized invoices, receipts for materials, work orders, and before/after photos. You’ll also want to ensure compliance with the contract terms and communicate any discrepancies to relevant parties promptly.
4. Confirm Compliance Paperwork
In this step, you’ll review all compliance paperwork to ensure it meets regulatory requirements and is complete. If any additional documentation is needed, follow up promptly to avoid delays in the closing process. Examples of compliance paperwork include various forms like purchase agreements and property condition reports, disclosure documents such as lead paint disclosures, and certifications confirming compliance with specific regulations like energy efficiency certifications. Part of your job as a Transaction Coordinator is to conduct a thorough review and address any deficiencies promptly.
As you prepare the transaction for closing, it’s important to make sure that you obtain the Commission Disbursement Authorization (CDA) from the agent’s brokerage. As well as submit it to the designated parties handling the closing. Don’t forget to double-check that all details regarding commission disbursement are accurate and up-to-date. Make sure that the CDA is submitted on time to ensure that all parties receive their rightful commissions.
6. Check In with the Lender and Title Company
As the transaction coordinator, you should proactively check in with these key stakeholders to confirm receipt of all necessary documents and information. This ensures that the file is complete and meets the stringent requirements set forth by both the lender and title company.
You must also diligently review the documentation to ensure it complies with the specific standards and regulations mandated by the lender and title company. Make sure to promptly address any discrepancies or outstanding issues to prevent last-minute complications that could potentially derail the closing process.
Addressing concerns or resolving issues in advance not only helps mitigate risks but also fosters a sense of confidence and trust among all parties involved. By maintaining a proactive and collaborative approach to communication with the lender and title company, you play a crucial role in facilitating a smooth and successful closing, ultimately ensuring a positive experience for all parties.
7. Send Client Closing Details
As a TC, you will provide clients with comprehensive details regarding the closing appointment. Additionally, include instructions regarding the documents they need to bring, such as identification, proof of insurance, and any required financial documents. This includes specifying the date, time, and location of the closing, ensuring that they arrive promptly and at the correct venue. Anticipating common questions clients may have, such as what to expect during the closing process or how to handle certain scenarios, allows for the proactive provision of answers, alleviating potential confusion or stress. By empowering clients with clear and thorough instructions, TCs contribute to a smoother and more confident closing experience, fostering trust and satisfaction throughout the transaction.
Closing Thoughts
As the real estate closing date approaches, the pressure mounts to ensure that every aspect is handled with precision and care. From scheduling the closing to meticulously coordinating final walkthroughs and gathering essential documentation, TCs are the linchpin that holds the entire process together.
As outlined in this action plan for the crucial seven to 10 days leading up to closing, success hinges on proactive communication, meticulous planning, and unwavering attention to detail. By initiating timely communication with all stakeholders, organizing critical appointments, and confirming the completion of vital tasks such as repairs and compliance paperwork, the TC lays the groundwork for a seamless and successful closing.
Aspiring closing coordinators must recognize that their role extends beyond merely checking items off a list. It’s about curating a flawless and memorable closing experience for all parties involved. By leveraging tools like ListedKit, TCs can streamline their workflow, receive timely reminders for approaching deadlines, and effortlessly communicate with third parties. Get started for free today!
Closing a real estate deal involves many moving parts, making it crucial to understand and effectively communicate these components. Successful transaction management is primarily about fostering relationships and ensuring that all aspects of the transaction progress smoothly. In this guide, we’ll explore valuable tips to help you manage closing timelines and present a list of essential due dates, along with potential challenges that every transaction coordinator should keep in mind.
Tips for Effectively Managing Due Dates in a Real Estate Deal
As a transaction coordinator, juggling multiple deadlines and milestones is part of the job, many of which are beyond your control. Therefore, being proactive and flexible is key. When handling transaction checklists and timelines, consider the following:
Maintain Regular Communication: Ensure consistent communication with all involved parties, including the lender, inspector, appraiser, title company, and attorney.
Be Proactive: Take proactive steps, such as getting pre-approved for a mortgage loan, ordering a home inspection, and having all necessary documents ready.
Plan for the Unexpected: Recognize that various factors can impact closing timelines, such as weather, repairs, financing, title issues, legal matters, and personal circumstances. Always have a contingency plan in case of surprises or challenges.
Stay Calm and Positive: Managing your attitude is crucial for effective leadership and maintaining professional relationships with all parties involved.
Celebrate Success: Once the deal is closed, take the time to acknowledge and congratulate yourself, the other party, and your team. Share feedback and referrals with agents and the team, fostering lasting relationships.
By following these tips, you can enhance your ability to navigate tight timelines and ensure a smoother real estate transaction process.
Essential Due Dates From Contract to Close
As a transaction coordinator, keeping a vigilant eye on crucial due dates is paramount for the seamless progression of real estate transactions. Let’s delve into these milestones and practical tips:
Offer Acceptance (Day 1):
This marks the official acceptance of the offer.
Ensure all parties promptly sign the Purchase Agreement.
Facilitate communication between buyers and sellers to prevent any delays in offer acceptance.
Earnest Money Deposit Deadline:
Buyers demonstrate commitment to the transaction by submitting an earnest money deposit within a specified timeframe.
Set clear expectations regarding consequences for late submissions and use agent reminders when appropriate.
Inspection Period:
Buyers conduct a thorough inspection of the property to identify any potential issues.
File the inspection report promptly and encourage open communication between buyers and sellers.
Be prepared for potential disagreements that might extend the inspection period.
Appraisal Deadline:
An appraisal is conducted to determine the property’s market value.
File the appraisal report and be prepared to negotiate if the appraisal comes in below the purchase price.
Effective communication and collaboration with all parties involved are crucial.
Loan Approval Deadline:
Buyers secure final approval for their mortgage loan within a specified period.
Anticipate potential delays in loan approval, maintain open communication with the lender, and assist buyers in promptly addressing any issues that may arise.
Title Search and Commitment:
A title search is conducted to identify any potential issues with the property’s title.
Work closely with the title company to promptly resolve any concerns that may arise.
Free Transaction Timeline
Keep these due dates top of mind by printing out this free timeline.
In navigating these due dates, transaction coordinators play a pivotal role. Staying organized, proactive, and adaptable ensures a successful closing process for all parties involved. Adhering to these milestones and implementing the provided tips significantly contributes to the efficiency and success of real estate transactions.
This website collects cookies to deliver better user experience.
Functional
Always active
The technical storage or access is strictly necessary for the legitimate purpose of enabling the use of a specific service explicitly requested by the subscriber or user, or for the sole purpose of carrying out the transmission of a communication over an electronic communications network.
Preferences
The technical storage or access is necessary for the legitimate purpose of storing preferences that are not requested by the subscriber or user.
Statistics
The technical storage or access that is used exclusively for statistical purposes.The technical storage or access that is used exclusively for anonymous statistical purposes. Without a subpoena, voluntary compliance on the part of your Internet Service Provider, or additional records from a third party, information stored or retrieved for this purpose alone cannot usually be used to identify you.
Marketing
The technical storage or access is required to create user profiles to send advertising, or to track the user on a website or across several websites for similar marketing purposes.